SpringBoot笔记持续更新中!
SpringBoot 发布者订阅者 样例场景: 我们需要在用户注册后 给订阅的用户推送消息(例如前100名注册的 系统自动发放徽章等)
1
2
3
4
5
6
7
8
@Override @Transactional public Long register (User insert) { boolean save = userDao.save(insert); applicationEventPublisher.publishEvent(new UserRegisterEvent (this , insert)); return insert.getId(); }
这个时候我们可以采用Spring的推送事件ApplicationEventPublisher, 其中除此之外我们还可以采用MQ进行同等操作
我们定义一个事件, 继承ApplicationEvent然后定义构造函数, 我们此时场景需要用户的信息, 故我们在构造函数传入User即可
1 2 3 4 5 6 7 8 9 10 11 12 13 14 15 @Getter public class UserRegisterEvent extends ApplicationEvent { private User user; public UserRegisterEvent (Object source, User user) { super (source); this .user = user; } }
此项我们只需要在方法上使用注解@EventListener或 带事务的TransactionalEventListener, 需不需要带事务则看具体应用场景, 此时的事务类型为枚举项, 事务为是否加入父事务执行, @Async异步执行
我们需要在注解处标明刚刚定义的事件推送者 , 然后在方法处传入该事件, 对于 Object source则传入this事件即可, 然后对其进行处理
1 2 3 4 5 6 7 8 9 10 11 12 13 14 15 16 17 18 19 20 21 22 23 24 25 26 27 28 29 30 31 32 33 34 35 36 37 38 @Component public class UserRegisterListener { @Autowired private IUserBackpackService userBackpackService; @Autowired private UserDao userDao; @Async @TransactionalEventListener(classes = UserRegisterEvent.class, phase = TransactionPhase.AFTER_COMMIT) public void sendCard (UserRegisterEvent userRegisterEvent) { User user = userRegisterEvent.getUser(); userBackpackService.acquireItem(user.getId(), ItemEnum.MODIFY_NAME_CARD.getId(), IdempotentEnum.UID, user.getId().toString()); } @Async @TransactionalEventListener(classes = UserRegisterEvent.class, phase = TransactionPhase.AFTER_COMMIT) public void sendBadge (UserRegisterEvent userRegisterEvent) { User user = userRegisterEvent.getUser(); int registeredUserCount = userDao.count(); if (registeredUserCount < 10 ){ userBackpackService.acquireItem(user.getId(), ItemEnum.REG_TOP10_BADGE.getId(), IdempotentEnum.UID, user.getId().toString()); }else if (registeredUserCount <100 ){ userBackpackService.acquireItem(user.getId(), ItemEnum.REG_TOP100_BADGE.getId(), IdempotentEnum.UID, user.getId().toString()); } } }
对于文件结构定义: 我们可以采用定义一个event包+event包下的listener包,
配置文件 读取YML配置文件信息 导入依赖:
1 2 3 4 5 6 7 8 9 10 11 <dependency > <groupId > org.springframework.boot</groupId > <artifactId > spring-boot-configuration-processor</artifactId > <optional > true</optional > </dependency >
yml样例:
1
2
3
4
5
6
7
8
9
10
11
12
13
product: pname: apple price: 20.5 is-used: true man-date: 2021 /09/09 attributes: {'color': 'red' ,'type' :'good' } address: province: 湖南省 city: 长沙 types: - 水果 - 零食
对应的实体类:
1
2
3
4
5
6
7
8
9
10
11
12
13
14
@Data @ConfigurationProperties(prefix = "product") @Component public class Product implements Serializable { private String pname; private Double price; private Boolean isUsed; private Date manDate; private Map<String, Object> attributes; private Address address; private List<String> types; }
1
2
3
4
5
@Data public class Address implements Serializable { private String province; private String city; }
测试类:
1
2
3
4
5
6
7
8
9
10
11
@RunWith(SpringRunner.class) @SpringBootTest() public class ProductTest { @Autowired private Product product; @Test public void testProduct () { Assert.assertNotNull(product); Assert.assertEquals("apple" , product.getPname()); } }
其中我们需要导入的junit的包是这个 import org.junit.Test;
不是 import org.junit.jupiter.api.Test;
不然会报错 Runner org.junit.internal.runners.ErrorReportingRunner does not support filtering and will ther
读取其他配置文件内容 1.读取例如properties配置 @PropertySource()
在配置文件中加入注解
1 2 @PropertySource(value = {"classpath:db.properties"})
db.properties配置文件
1
2
username =root password =123456
如何在Spring中使用呢? 使用@Value(${username})注解
1
2
@Value(${username}) private String username;
2.读取例如xml配置 @ImportResource
在配置文件中加入注解
1 2 @ImportResource(locations = {"classpath:spring.xml"})
1
2
3
4
5
6
7
8
9
<?xml version="1.0" encoding="UTF-8" ?> <beans xmlns ="http://www.springframework.org/schema/beans" xmlns:xsi ="http://www.w3.org/2001/XMLSchema-instance" xsi:schemaLocation ="http://www.springframework.org/schema/beans http://www.springframework.org/schema/beans/spring-beans.xsd" > <bean id ="us" class ="com.hang.springboot.entity.User" > <property name ="name" value ="zhang" > </property > </bean > </beans >
读取:
1
2
3
@Autowired @Qualifier(value = "us") private User user;
在运行时修改配置文件信息
在命令行参数中配置
1 java -jar xxx.jar --server.port=9090
此项使用必须建立在启动类的run方法中,传入了main函数中的args参数
1
2
3
4
5
6
7
8
@SpringBootApplication public class Application { public static void main (String[] args) { SpringApplication.run(Application.class, args); } }
2.传入虚拟机系统属性
1 java -Dserver.port=9090 -jar xxx.jar
-D 设置虚拟参数 其中server.port是自己需要修改的配置
1
2
3
4
5
6
7
@SpringBootApplication public class Application { public static void main (String[] args) { SpringApplication.run(Application.class); } }
在最后,我们还能添加属性在配置文件里面,例如我需要加属性: name=qiuqiu
eg: java -jar xxx.jar --server.port=9090 --name=qiuqiu
java -Dserver.port=9090 -Dname=qiuqiu -jar xxx.jar
SpringBoot读取配置信息、环境变量
Environment基本的环境变量
1 2 3 @Autowired private Environment environment;
2.ConfigurableEnvironment环境变量
1
2
@Resource private ConfigurableEnvironment configurableEnvironment;
ConfigurableEnvironment是Environment的子接口,功能更多
注入之后,直接调用即可
多环境配置 多数据源配置 多环境:
开发时分为多个环境: 开发环境 (dev) , 测试环境 (test) , 生产环境 (prod)
系统默认application.yml
1.通过在application.xml默认配置文件中配置
1 2 3 4 spring: profiles: active: dev
2.通过注解配置 @Profile("dev"),加入在带@Configuration注解的配置类中
多环境配置,如果设置的环境跟默认环境有相同的配置 , 则当前设置的环境会覆盖默认环境的相同配置属性
多数据源:
在@Configuration修饰的配置类中配置数据源
1
2
3
4
5
6
7
8
9
10
11
12
13
14
15
16
17
18
19
20
21
22
23
24
25
26
27
28
29
30
31
32
33
@Value("${driverClassName}") private String driverName;@Value("${username}") private String username;@Value("${password}") private String password;@Value("${url}") private String url;@Bean @Profile("test") public DataSource localDataSource () { DriverManagerDataSource source = new DriverManagerDataSource (); source.setDriverClassName(driverName); source.setUsername(username); source.setPassword(password); source.setUrl(url); return source; } @Bean @Profile("prod") public DataSource localDataSource () { DruidDataSource source = new DruidDataSource (); source.setDriverClassName(driverName); source.setUsername(username); source.setPassword(password); source.setUrl(url); return source; }
此时则只会有一个数据源的bean
日志配置 基础配置
1 2 3 4 5 6 7 8 9 10 11 12 13 14 logging: level: root: debug org.springframework: error org.apache: error file: name: spring.log path: logs/
滚动配置
暂无
Pom文件相关 spring-boot-start-test
对于spring-boot-starter-test的依赖, 默认是引入junit4和junit5
1 2 3 4 5 6 7 8 9 10 11 12 <dependency > <groupId > org.springframework.boot</groupId > <artifactId > spring-boot-starter-test</artifactId > <scope > test</scope > <exclusions > <exclusion > <groupId > org.junit.vintage</groupId > <artifactId > junit-vintage-engine</artifactId > </exclusion > </exclusions > </dependency >
docker打包
1 2 3 4 5 6 7 8 9 10 11 12 13 14 15 16 17 18 19 20 21 22 <plugin > <groupId > com.spotify</groupId > <artifactId > dockerfile-maven-plugin</artifactId > <version > 1.4.13</version > <executions > <execution > <id > default</id > <goals > <goal > build</goal > <goal > push</goal > </goals > </execution > </executions > <configuration > <repository > javastack/${project.name}</repository > <tag > ${project.version}</tag > <buildArgs > <JAR_FILE > ${project.build.finalName}.jar</JAR_FILE > </buildArgs > <dockerfile > Dockerfile</dockerfile > </configuration > </plugin >
测试类 一、普通测试类 和 套件 例如此时我有一个service类需要测试:
1
2
3
4
5
6
@Component public class Calculator { public int add (int a, int b) { return a + b; } }
首先需要加注解@Component 交给Spring管理
然后在当前的包中右键,点击Go To -> Test -> Create New Test 一般点击OK即可
然后idea在test包下就会自动创建一个跟当前类同样结构的测试类
在测试类中需要引入注解
1 2 3 @SpringBootTest(classes = SpringBootApplication.class) @RunWith(SpringRunner.class)
测试(单方法,单类):
1
2
3
4
5
6
7
8
9
10
11
12
13
14
15
16
17
18
@SpringBootTest() @RunWith(SpringRunner.class) public class CalculatorTest { @Autowired private Calculator calculator; @Test void add () { int add = calculator.add(1 , 2 ); Assert.assertEquals(3 , add); } }
现在需求是: 假如有多个类,类里面有很多方法需要测试,那该怎么实现一起自动化测试?
: 使用SpringBoot的套件测试 , 顾名思义:把测试方法类全部放一起测试,就跟一个整体套件一样
启动当前类就可以了
1 2 3 4 5 6 7 8 9 10 @RunWith(Suite.class) @Suite .SuiteClasses({CalculatorTest.class,OtherTest.class}) public class SuiteTest {}
二、其他的注解: 1) @Disabled:禁用测试方法, 用于当前方法现在不需要进行测试
1
2
3
4
5
@Test @Disabled("This test is not ready yet.") public void disabledTest () { }
2) @TestMethodOrder 和 @Order:配置测试方法的执行顺序
1
2
3
4
5
6
7
8
9
10
11
12
13
14
15
@TestMethodOrder(MethodOrderer.OrderAnnotation.class) public class OrderTest { @Order(1) @Test public void testMethod1 () { } @Order(2) @Test public void testMethod2 () { } }
3) @BeforeAll 和 @AfterAll:在测试类的所有测试方法前和后执行一次,可用于全局初始化和销毁资源
1
2
3
4
5
6
7
8
9
@BeforeAll public static void initOperate () { } @AfterAll public static void destoryOperate () { }
4) @BeforeEach 和 @AfterEach:在测试类的每个测试方法前和后都会执行一次
1
2
3
4
5
6
7
8
9
@BeforeEach public void beforeEachTest () { } @AfterEach public void afterEachTest () { }
5) @RepeatedTest:指定测试方法重复执行
1
2
3
4
@RepeatedTest(6) public void repeatedTest () { }
6) @ParameterizedTest 和 @ValueSource:用于参数化测试
1
2
3
4
5
@ParameterizedTest @ValueSource(strings = { "name1", "name2", "name3" }) public void testParameter (String name) { }
:启用MockMvc的自动配置,可用于测试接口
1
2
3
4
5
6
7
8
9
10
11
12
13
14
@SpringBootTest @AutoConfigureMockMvc public class MyControllerIntegrationTest { @Autowired private MockMvc mockMvc; @Test public void testController () throws Exception { mockMvc.perform(get("/api/someendpoint" )) .andExpect(status().isOk()) .andExpect(content().contentType(MediaType.APPLICATION_JSON)); } }
切换服务器 在pom.xml里面修改,例如需要把tomcat修改为undertow
1 2 3 4 5 6 7 8 9 10 11 12 13 14 15 16 <dependency > <groupId > org.springframework.boot</groupId > <artifactId > spring-boot-starter-web</artifactId > <exclusions > <exclusion > <groupId > org.springframework.boot</groupId > <artifactId > spring-boot-starter-tomcat</artifactId > </exclusion > </exclusions > </dependency > <dependency > <groupId > org.springframework.boot</groupId > <artifactId > spring-boot-starter-undertow</artifactId > </dependency >
部分执行控制台输出如下
定时器
在启动类中标明注解@EnableScheduling
编写一个Job任务类,在类上面标明@Component注解给spring托管
在@Scheduled中写cron表达式设置定时
以Redis缓存文章浏览量同步数据库为例: (当前需要在启动时 ,需要有缓存,需要看下面的启动任务 )
1
2
3
4
5
6
7
8
9
10
11
12
13
14
15
16
17
18
19
@Component public class UpdateViewCountJob { @Autowired private RedisCache redisCache; @Autowired private ArticleService articleService; @Scheduled(cron = "0 */10 * * * ?") public void updateViewCountJob () { Map<String, Integer> viewCountMap = redisCache.getCacheMap(SystemConstants.ARTICLE_VIEW_COUNT); List<Article> articleList = viewCountMap.entrySet() .stream() .map(entry -> new Article (Long.valueOf(entry.getKey()), entry.getValue().longValue())) .collect(Collectors.toList()); articleService.updateBatchById(articleList); } }
启动前预加载服务 1 2 3 4 5 6 7 8 9 10 11 12 13 14 15 16 17 18 19 20 21 22 23 24 25 26 27 @Component public class ViewCountRunner implements CommandLineRunner { @Autowired private ArticleMapper articleMapper; @Autowired private RedisCache redisCache; @Override public void run (String... args) throws Exception { List<Article> articleList = articleMapper.selectList(null ); Map<String, Integer> map = new HashMap <>(); map = articleList.stream() .collect(Collectors.toMap(article -> article.getId().toString(), article -> { return article.getViewCount().intValue(); })); redisCache.setCacheMap(SystemConstants.ARTICLE_VIEW_COUNT,map); } }
自定义的Runner实现了CommandLineRunner类,重写run方法,该方法在SpringBoot启动时也会同步执行该任务,这个是SpringBoot提供的简单类
: 如果在上下文中,存在多个该接口实现类,可以通过@order注解,指定加载顺序
@Order写在实现类上 例如@Order(value = 1) 越前越快执行
SpringBoot的自动配置 1、了解注解及一些类 @Configuration结合@Beaneg. @Configuration,里面的proxyBeanMethods属性 true : false
proxyBeanMethods配置类是用来指定@Bean注解标注的方法是否使用代理,默认是true使用动态代理 ,直接从IOC容器之中取得对象;提高性能 ,但是不能扩展,例如AOP切面
优缺点 : 设置true动态代理的可以后期被切面增强,但是启动速度性能慢些,设置false则使用new对象,提高性能但是不能被增强
@EnableAutoConfiguration(xx.class)帮助SpringBoot应用将所有符合条件 的@Configuration配置都加载到当前SpringBoot,并创建对应配置类的Bean ,并把该Bean实体交给IoC容器进行管理
该注解的功能更强大,托管配置类并把bean托管 ,可以读取属性文件注入
@ConfigurationProperties(prefix = "")一次性读取符合前缀的属性配置文件,只能注入属性
@Import
导入外部的class文件
1 2 3 @Import({Apple.class,Product.class})
2.导入一个包的多个类
假如需要导入的类多了,那么则需要使用该方式,我们需要创建一个类实现ImportSelector接口
1 2 3 4 5 6 7 8 9 10 11 public class ImportList implements ImportSelector { @Override public String[] selectImports(AnnotationMetadata importingClassMetadata) { String url = "META-INF/" return new String []{ }; } }
然后使用@Import({ImportList.class,Other.class})导入刚刚的类
ApplicationContextAware接口在类中注入Spring容器对象 1 2 3 4 5 6 7 8 9 10 11 12 13 14 15 @RestController public class SpringBeansGetInfoClass implements ApplicationContextAware { private ApplicationContext context; @Override public void setApplicationContext (ApplicationContext applicationContext) throws BeansException { this .context = applicationContext; } @GetMapping("/getSpringBeanInfo") public void getBeanNameInfo () { for (String name : this .context.getBeanDefinitionNames()) { System.out.println(name); } } }
实现ApplicationContextAware接口的类必须被Spring所管理
作用: 换句话说,就是这个类可以直接获取Spring配置文件中,所有有引用到的Bean对象
@Conditional条件判断注解
例如,我需要动态加载Tomcat或Jetty服务器,即 如果容器中有服务器某Bean则加载,当然还要判断是否有多个服务器判断(当前实例未做判断,具体看自动配置WebServer服务
1 2 3 4 5 6 7 8 9 10 11 12 13 14 15 16 17 18 19 20 @Configuration public class WebServerAutoConfiguration { @Bean @Conditional(TomcatCondition.class) public TomcatWebServer tomcatWebServer () { return new TomcatWebServer (); } @Bean @Conditional(JettyCondition.class) public JettyWebServer jettyWebServer () { return new JettyWebServer (); } }
条件判断类 必须实现Condition接口,重写matches方法
1 2 3 4 5 6 7 8 9 10 11 12 13 14 15 public class TomcatCondition implements Condition { @Override public boolean matches (ConditionContext conditionContext, AnnotatedTypeMetadata annotatedTypeMetadata) { try { conditionContext.getClassLoader().loadClass("org.apache.catalina.startup.Tomcat" ); return true ; } catch (ClassNotFoundException e) { return false ; } } }
2、自动配置start 样例一: DataSource 以读取spring.datasource为例:
例如我的application.yml如下:
1 2 3 4 5 6 7 8 9 10 11 12 13 14 server: port: 8080 spring: datasource: url: jdbc:mysql://localhost:3306/test?useUnicode=true&characterEncoding=utf-8&serverTimezone=UTC&useSSL=true username: root password: root driver-class-name: com.mysql.cj.jdbc.Driver jackson: date-format: yyyy-MM-dd HH:mm:ss time-zone: GMT+8 serialization: write-dates-as-timestamps: false
查看源码
我们简单的查看到,该类里面包含一些通用的数据源属性,并且通过注解@ConfigurationProperties(prefix = "spring.datasource")读取application.yml配置文件设置的值, 但是注意到,该属性在此处并未在spring容器中注入 ,那么spring是如何进行初始化的呢?
当前是自动装配,那当然是自动装配了,那么是在哪儿自动装配?
: 在此包中 , 很容易找到一个名为DatasourceAutoConfiguration的类 ,通过类名注意到这很显然是一个自动装配数据源的类
找到自动配置类, 即 带@EnableConfigurationProperties注解的类, 通过此注解对刚刚已经注入属性的类进行IOC注册, 那么这个就被自动装配了
样例二: WebServer 在此处,再举一个例子(样例二 )如下,例如我需要对服务器的配置 , 比如server.port=9090服务器的端口等
步骤一: 对服务器的基础配置进行读取
文件在org.springframework.boot的 spring-boot-autoconfigure里面的org.springframework.boot.autoconfigure.web.ServerProperties
ServerProperties类 里面同样可以看到注解@ConfigurationProperties
1 2 3 4 5 6 7 8 9 10 11 12 13 14 15 16 17 18 19 20 21 22 23 24 25 26 27 @ConfigurationProperties( prefix = "server", // 读取配置文件属性 ignoreUnknownFields = true ) public class ServerProperties { private Integer port; private InetAddress address; @NestedConfigurationProperty private final ErrorProperties error = new ErrorProperties (); private ForwardHeadersStrategy forwardHeadersStrategy; private String serverHeader; private DataSize maxHttpHeaderSize = DataSize.ofKilobytes(8L ); private Shutdown shutdown; @NestedConfigurationProperty private Ssl ssl; @NestedConfigurationProperty private final Compression compression; @NestedConfigurationProperty private final Http2 http2; private final Servlet servlet; private final Reactive reactive; private final Tomcat tomcat; private final Jetty jetty; private final Netty netty; private final Undertow undertow; }
步骤二: 对服务器配置完成的类在IOC容器中进行注册bean
在当前的package下的
org.springframework.boot.autoconfigure.web.embedded.EmbeddedWebServerFactoryCustomizerAutoConfiguration
我们可以看到熟悉的结构
1 2 3 4 5 6 7 8 9 10 11 12 13 14 15 16 17 18 19 20 21 22 @AutoConfiguration @ConditionalOnWebApplication @EnableConfigurationProperties({ServerProperties.class}) public class EmbeddedWebServerFactoryCustomizerAutoConfiguration { public EmbeddedWebServerFactoryCustomizerAutoConfiguration () { } @Configuration( proxyBeanMethods = false ) @ConditionalOnClass({HttpServer.class}) public static class NettyWebServerFactoryCustomizerConfiguration { public NettyWebServerFactoryCustomizerConfiguration () { } @Bean public NettyWebServerFactoryCustomizer nettyWebServerFactoryCustomizer (Environment environment, ServerProperties serverProperties) { return new NettyWebServerFactoryCustomizer (environment, serverProperties); } } }
两个样例总结 从以上步骤可以看出spring-boot-starter的配置流程较简单,简化一下流程即为:
1.添加@ConfigurationProperties读取application.yml配置文件@EnableAutoConfiguration注解类,自动扫描package生成所需beanspring.factories 配置让spring-boot-autoconfigure对当前项目进行AutoConfiguration
SpringBoot自动配置 样例总结 说到读取spring.factories ,那么springboot底层是如何进行读取,并且自动配置呢?
首先我们从启动类入口入手,@SpringBootApplication , 追踪发现注解@EnableAutoConfiguration
1 2 3 4 5 6 7 8 9 10 11 12 13 14 15 16 17 18 19 20 21 22 @Target({ElementType.TYPE}) @Retention(RetentionPolicy.RUNTIME) @Documented @Inherited @SpringBootConfiguration @EnableAutoConfiguration @ComponentScan( excludeFilters = {@Filter( type = FilterType.CUSTOM, classes = {TypeExcludeFilter.class} ), @Filter( type = FilterType.CUSTOM, classes = {AutoConfigurationExcludeFilter.class} )} ) public @interface SpringBootApplication { @AliasFor( annotation = EnableAutoConfiguration.class ) Class<?>[] exclude() default {}; }
打开@EnableAutoConfiguration
1 2 3 4 5 6 7 8 9 10 11 @Target({ElementType.TYPE}) @Retention(RetentionPolicy.RUNTIME) @Documented @Inherited @AutoConfigurationPackage @Import({AutoConfigurationImportSelector.class}) public @interface EnableAutoConfiguration { String ENABLED_OVERRIDE_PROPERTY = "spring.boot.enableautoconfiguration" ; Class<?>[] exclude() default {}; String[] excludeName() default {}; }
它导入了一个名为AutoConfigurationImportSelector的自动装配类选择器 , 并且追踪, 它实现了DeferredImportSelector 该类为 ImportSelector的子类
1 2 3 4 5 6 7 8 9 10 11 12 public class AutoConfigurationImportSelector implements DeferredImportSelector , BeanClassLoaderAware, ResourceLoaderAware, BeanFactoryAware, EnvironmentAware, Ordered { private static final AutoConfigurationEntry EMPTY_ENTRY = new AutoConfigurationEntry (); private static final String[] NO_IMPORTS = new String [0 ]; private static final Log logger = LogFactory.getLog(AutoConfigurationImportSelector.class); private static final String PROPERTY_NAME_AUTOCONFIGURE_EXCLUDE = "spring.autoconfigure.exclude" ; private ConfigurableListableBeanFactory beanFactory; private Environment environment; private ClassLoader beanClassLoader; private ResourceLoader resourceLoader; private ConfigurationClassFilter configurationClassFilter; }
ImportSelector类,实现该类重写方法获取需要扫描的包 , 并且返回全类名
1 2 3 4 5 6 7 8 public interface ImportSelector { String[] selectImports(AnnotationMetadata importingClassMetadata); @Nullable default Predicate<String> getExclusionFilter () { return null ; } }
在AutoConfigurationImportSelector中实现了selectImports方法
1 2 3 4 5 6 7 8 9 10 11 public String[] selectImports(AnnotationMetadata annotationMetadata) { if (!this .isEnabled(annotationMetadata)) { return NO_IMPORTS; } else { AutoConfigurationEntry autoConfigurationEntry = this .getAutoConfigurationEntry(annotationMetadata); return StringUtils.toStringArray(autoConfigurationEntry.getConfigurations()); } }
getAutoConfigurationEntry方法
1 2 3 4 5 6 7 8 9 10 11 12 13 14 15 16 17 protected AutoConfigurationEntry getAutoConfigurationEntry (AnnotationMetadata annotationMetadata) { if (!this .isEnabled(annotationMetadata)) { return EMPTY_ENTRY; } else { AnnotationAttributes attributes = this .getAttributes(annotationMetadata); List<String> configurations = this .getCandidateConfigurations(annotationMetadata, attributes); configurations = this .removeDuplicates(configurations); Set<String> exclusions = this .getExclusions(annotationMetadata, attributes); this .checkExcludedClasses(configurations, exclusions); configurations.removeAll(exclusions); configurations = this .getConfigurationClassFilter().filter(configurations); this .fireAutoConfigurationImportEvents(configurations, exclusions); return new AutoConfigurationEntry (configurations, exclusions); } }
getCandidateConfigurations方法 获取候选的配置属性
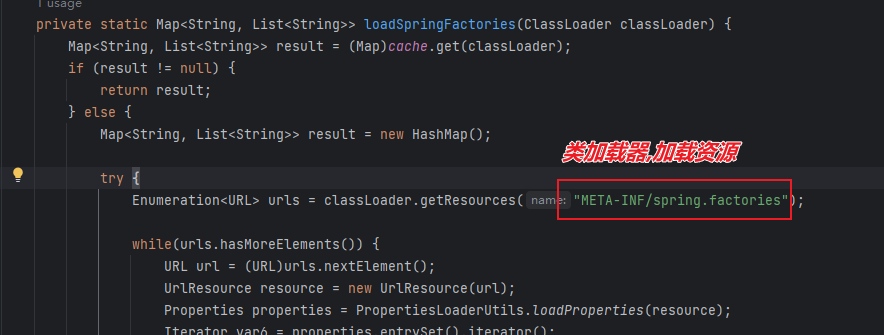
1 2 3 4 5 6 7 8 9 protected List<String> getCandidateConfigurations (AnnotationMetadata metadata, AnnotationAttributes attributes) { List<String> configurations = new ArrayList(SpringFactoriesLoader.loadFactoryNames(this .getSpringFactoriesLoaderFactoryClass(), this .getBeanClassLoader())); ImportCandidates.load(AutoConfiguration.class, this .getBeanClassLoader()).forEach(configurations::add); Assert.notEmpty(configurations, "No auto configuration classes found in META-INF/spring.factories nor in META-INF/spring/org.springframework.boot.autoconfigure.AutoConfiguration.imports. If you are using a custom packaging, make sure that file is correct." ); return configurations; }
很容易发现 , springboot使用spring的类加载器,加载类 , 在断言处,发现不能为空的断言,分析: 没有自动配置类 找到在路径META-INF/spring.factories nor in META-INF/spring/org.springframework.boot.autoconfigure.AutoConfiguration.imports中,也就是说 读取配置类是读取固定路径(这种机制叫做SPI 机制),是一种服务提供发现机制 , 然后读取了两个文件
其中这两个文件,包含了大量SpringBoot启动时需要读取的配置类
打开加载工厂bean方法 loadFactoryNames (该方法读取的是第一个配置文件 spring.factories)
通过类加载器,通过文件配置
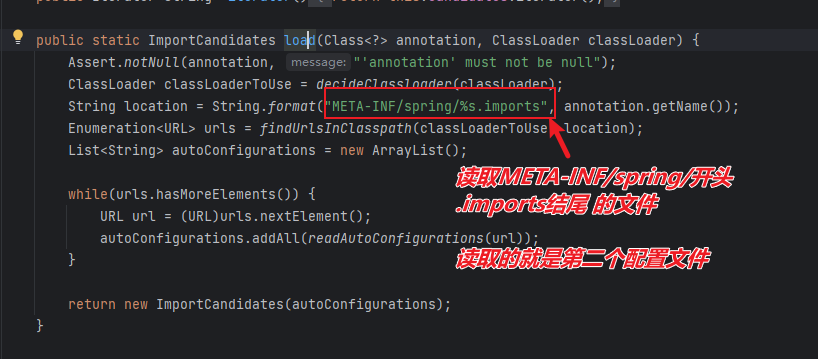
读取第二个配置文件 通过 load()方法,点开发现
通过流的读取,把配置文件按行读取,形成一个数组
在第二个配置文件中读取到例如org.springframework.boot.autoconfigure.web.embedded.EmbeddedWebServerFactoryCustomizerAutoConfiguration的Web服务器类,spring则会去自动读取扫描配置Web服务的配置类并且注入托管,就是前面说到的[Web配置流程](#样例二: WebServer) ,经历 配置文件读取,配置类读取,配置类根据条件注入,bean托管等流程
SpringBoot Starter分析及自定义 SpringBoot Starter: 启动类 分析starter的启动流程:
依赖分析: 从SpringBoot starter开始 1 2 3 4 <dependency > <groupId > org.springframework.boot</groupId > <artifactId > spring-boot-starter-web</artifactId > </dependency >
追踪发现 包含依赖:
1 2 3 4 5 6 <dependency > <groupId > org.springframework.boot</groupId > <artifactId > spring-boot-starter</artifactId > <version > 2.7.3</version > <scope > compile</scope > </dependency >
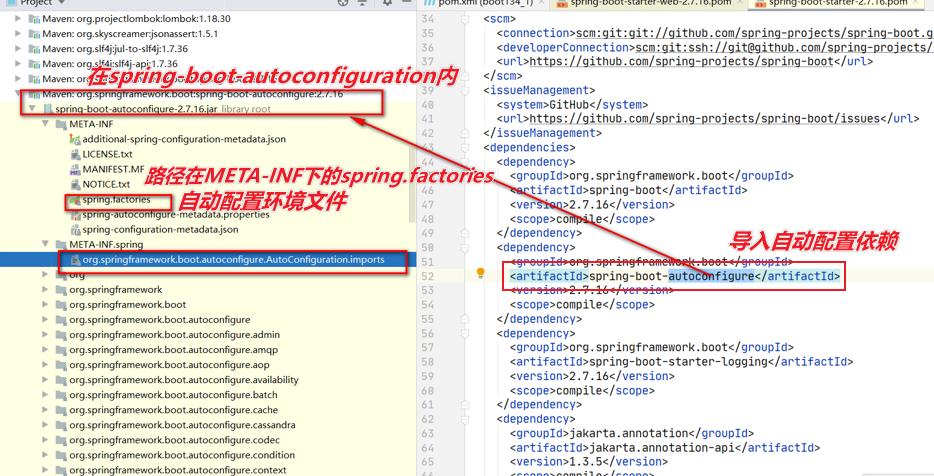
再追踪: 然后发现了有一个依赖是spring-boot-autoconfigure
1 2 3 4 5 6 7 <dependency > <groupId > org.springframework.boot</groupId > <artifactId > spring-boot-autoconfigure</artifactId > <version > 2.7.3</version > <scope > compile</scope > </dependency >
打开依赖 org.springframework.boot:spring-boot-starter
idea 中的 maven依赖结构如下:
spring-boot-starter
META-INF
LICENSE.txt
MANIFEST.MF
NOTICE.txt
所以:其实这个starter最重要的就是pom.xml文件,它引入了autoconfiguration的jar包
需要打开本地加载的依赖文件才能看到具体的结构
依赖结构:
标准的SpringBoot是将所有的自动配置类都写在了 xxx.factories,但我们自定义的starter是将配置类都写在了spring.factories文件中
MyBatis Starter 结构如下
其中mybatis的spring.factories的内容如下:
1 2 3 4 5 org.springframework.boot.autoconfigure.EnableAutoConfiguration=\ org.mybatis.spring.boot.autoconfigure.MybatisLanguageDriverAutoConfiguration,\ org.mybatis.spring.boot.autoconfigure.MybatisAutoConfiguration
1 2 3 4 5 6 7 8 9 10 11 12 13 14 15 ##### 两个案例总结: 包含两个模块: 一个是```starter```,一个是```autoconfiguration``` 其中在starter里面主要就是**引入autoconfiguration** 以及帮我们版本仲裁其它jar包 在```autoconfiguration```中是**托管配置类** , 比如我当前开发的Jdbc模块:那么我的starter则需要导入一些依赖,**重点是导入我的JdbcAutoConfiguration配置类**,其中它需要读取一些属性配置文件```Properties```,它包含了当前模块的配置属性信息, 位于```META-INF/spring.factories```的配置文件则是SpringBoot会自动读取的配置文件 ```java # Auto Configure 使用SpringBoot自动配置类 读取配置类 INF/spring.factories org.springframework.boot.autoconfigure.EnableAutoConfiguration=\ com.hang.myAutoConfiguration.JdbcAutoConfiguration
其中start中的pom文件依赖了autoconfiguration 包
1 2 3 4 5 6 7 <dependency > <groupId > com.hang</groupId > <artifactId > JdbcAutoConfiguration</artifactId > <version > 1.0-SNAPSHOT</version > </dependency >
至此: 我们只需要在SpringBoot项目中引入自定义的starter即可
自定义starter 以日期格式化DateFormat为例
定义一个autoconfiguration模块(包含AutoConfiguration和Properties)
AutoConfiguration
1 2 3 4 5 6 7 8 9 @Configuration @ConditionalOnClass({TimeFunction.class}) @EnableConfigurationProperties({TimeProperties.class}) public class DateFormatAutoConfiguration { @Bean public TimeFunction timeFunction () { return new TimeFunction (); } }
Properties
1 2 3 4 5 6 7 8 9 10 11 12 @ConfigurationProperties(prefix = "hang.time") public class TimeProperties { private String format = "yyyy-MM-dd HH:mm:ss" ; public String getFormat () { return format; } public void setFormat (String format) { this .format = format; } }
yml配置 (日期格式化自定义)
1 2 3 hang: time: format: yyyy年MM月dd日 HH:mm:ss
自定义函数
1 2 3 4 5 6 7 8 9 10 11 public class TimeFunction { @Autowired private TimeProperties timeProperties; public String showTime (String name) { Date date = new Date (); DateFormat df = new SimpleDateFormat (timeProperties.getFormat()); String format = df.format(date); return "欢迎您:" + name + "现在是:" + format; } }
定义一个starter模块
这个模块主要是引入autoconfiguration 模块
定义spring.factories文件(位于autoconfiguration的resource/META-INF下)
1 2 3 org.springframework.boot.autoconfigure.EnableAutoConfiguration=\ com.hang.dateFormatAutoConfiguration.DateFormatAutoConfiguration
如果不用starter自动配置,手动配置,需要配置属性文件解析Configuration-processor依赖
配置文件类通过@ConfigurationProperties(profix=””)读取配置文件
通过@Component注入spring,方法等用@Bean注入
@ComponentScan排除过滤器 AutoConfigurationExcludeFilter 对于里面的过滤器分析:(案例)
如果排除中有一个符合条件, 则排除扫描排除
1 2 3 4 5 6 7 8 9 @ComponentScan(excludeFilters = { @ComponentScan.Filter( type = FilterType.CUSTOM, classes = {TypeExcludeFilter.class} ),@ComponentScan.Filter( type = FilterType.CUSTOM, classes = {AutoConfigurationExcludeFilter.class} ) })
例如我有一个配置类
1 2 3 4 5 6 7 @Configuration public class AppConfig (){ @Bean public OrderService orderService () { return new OrderService (); } }
假如我在 resource下的META_INF下面的spring.factories中
1 2 3 # Auto Configure org.springframework.boot.autoconfigure.EnableAutoConfiguration=\ com.hang.AppConfig
众所周知, 在这个文件下配置了扫描路径也会被解析, 那么则会被解析两次 .
如果配置了此项, 则只会被解析一次
TypeExcludeFilter 配置此项需要单独定义一个排除过滤器, 继承自 TypeExcludeFilter, 重写match方法
例如我需要排除我的UserService
则通过重写类形参中的MetadataReader获取类信息然后判断即可
1 2 3 4 5 6 7 public class HangTypeExcludeFilter extends TypeExcludeFilter { @Override public boolean match (MetadataReader metadataReader, MetadataReaderFactory metadataReaderFactory) { return metadataReader.getClassMetadata().getClassName() .equals(UserService.class.getName()); } }
光配置了此项还不够, 因为在执行当前方法过滤时, 并不知道容器中有没有扫描到或者注册bean(大概), 从而导致已经开始过滤, 然后导致失效
我们在扫描之间就得放置一些bean, 该怎么做呢?
在spring.factories中
1 2 3 4 5 6 7 8 # 初始化器在创建容器对象后,扫描前执行 + # Initializersa + org.springframework.context.ApplicationContextInitializer=\ + com.hang.ApplicationContextInitializer # Auto Configure # -> 刚刚在上一个案例写的 org.springframework.boot.autoconfigure.EnableAutoConfiguration=\ com.hang.AppConfig
自定义一个初始化器
HangApplicationContextInitializer
1 2 3 4 5 6 7 8 public class HangApplicationContextInitializer implements ApplicationContextInitializer { @Override public void initialize (ConfigurableApplicationContext applicationContext) { applicationContext.getBeanFactory() .regiseterSingleton("HangTypeExcludeFilter" ,new HangTypeExcludeFilter ()); } }
此时则刚刚写的HangTypeExcludeFilter 中的 match匹配过滤则会生效了
SpringBoot Session整合Redis 1 2 3 4 5 6 7 8 9 <dependency > <groupId > org.springframework.boot</groupId > <artifactId > spring-boot-starter-data-redis</artifactId > </dependency > <dependency > <groupId > org.springframework.session</groupId > <artifactId > spring-session-data-redis</artifactId > </dependency >
修改Session未同步问题
在Session未整合Redis之前, 对数据的操作为引用数据类型 , 即修改已存在的session值, 自动同步
案例代码
1 2 3 4 5 6 7 8 9 10 11 12 13 14 15 16 17 18 19 20 21 22 23 24 25 26 27 28 29 30 31 32 33 34 35 36 37 38 39 40 @PostMapping("/addCart") public Result addCart (@RequestParam("fid") Integer fid, @RequestParam("num") Integer num, HttpSession session) { Resfood food = resfoodService.getById(fid); if (Objects.isNull(food)) { return Result.fail("没有此商品" ); } Map<Integer, CartItem> cart = null ; if (Objects.nonNull(session.getAttribute("cart" ))) { cart = (Map<Integer, CartItem>) session.getAttribute("cart" ); } else { session.setAttribute("cart" , cart); } CartItem cartItem; if (cart.containsKey(fid)) { cartItem = cart.get(fid); cartItem.setNum(cartItem.getNum() + 1 ); cart.put(fid, cartItem); } else { cartItem = new CartItem (); cartItem.setNum(num); cartItem.setResfood(food); cart.put(fid, cartItem); } if (cartItem.getNum() <= 0 ) { cart.remove(fid); } + session.setAttribute("cart" , cart); return Result.*ok*(cart.values()); }
样例中第37行处, 在没有把Session添加到Redis中前, 用户在对session的值修改后, tomcat自动同步更新session的数据, 即添加购物车不会出现 数量限制问题
但是将Session添加到Spring session data redis中的时候, 从一开始的引用类型变成了类似于值引用类型了, 即引用redis里面的session值, 并不会进行同步修改
经查源码: 在Spring整合Redis Session时采用了 事件监听 的方式, 即需要再次重复设置session的操作session.setAttribute() , Redis中的Session才会同步修改
SpringBoot Mockito测试 案例 Controller层 当前测试环境:JDK8 , SpringBoot2.7.3 , Junit4, MyBatis-Plus3.x
首先第一步先创建一个简单的MVC框架的测试用例,我们在Controller中右键Go to创建测试用例
1 2 3 4 5 6 7 8 9 10 11 12 13 14 15 16 @RestController @RequestMapping("/user") public class UserController { @Autowired private UserService userService; @GetMapping("/getById") public User getById (@RequestParam("id") Integer id) { return userService.getUserInfoById(id); } @PostMapping("/save") public String save (@RequestBody User user) { return userService.saveUserInfo(user) ? "保存成功" : "保存失败" ; } }
测试包
1 2 3 4 5 6 7 8 9 10 11 12 13 14 15 16 17 18 19 20 21 22 23 24 25 26 27 28 29 30 31 32 33 34 35 36 37 38 39 40 41 42 43 44 45 46 @Slf4j @RunWith(SpringRunner.class) @SpringBootTest(classes = {MockApplication.class}, // 在每一次进行mock测试时 启用随机端口启动 为例避免多个测试用例同时启动时不会产生端口占用问题 webEnvironment = SpringBootTest.WebEnvironment.RANDOM_PORT) @AutoConfigureMockMvc(addFilters = false) public class UserControllerTest { @Autowired private MockMvc mockMvc; @Test public void getById () { User user = new User (1 , "w" , "a" , "悟空" , "song@foxmail.com" , "13283718600" , "男" , 1 , null , "天子脚下" ); try { Integer id = 1 ; mockMvc.perform(MockMvcRequestBuilders.get("/user/getById" ) .contentType(MediaType.APPLICATION_JSON_VALUE) .param("id" ,"1" ) ) .andExpect(MockMvcResultMatchers.status().isOk()) .andExpect(MockMvcResultMatchers.jsonPath("$.name" , Matchers.equalToIgnoringCase(user.getName()))) .andDo(MockMvcResultHandlers.print()) .andReturn(); } catch (Exception e) { log.error("当前方法为:{},发生了异常" , "getById" ); throw new RuntimeException (e); } } @Test public void save () { } }
在当前测试用例中
注意到@SpringBootTest(webEnvironment = SpringBootTest.WebEnvironment.RANDOM_PORT),其中它代表 :在每一次进行mock测试时 启用随机端口启动 为例避免多个测试用例同时启动时不会产生端口占用问题
@AutoConfigureMockMvc(addFilters = false) : 这个用于自动配置和启用MockMvc配置
注入mockMvc
1 2 @Autowired private MockMvc mockMvc;
在mockMvc实例中,使用perform执行一个HTTP请求, 入口参数为RequestBuilder,输出结果为ResultAction
在perform中,使用MockMvcRequestBuilders请求构建器构造请求, 可以使用get或者post请求,在get或post里面写入请求路径,在后面还可以加请求内容类型contentType(MediaType.APPLICATION_JSON_VALUE),其中还能像SpringMVC一样设置其他的比如header,param
andExpect期望, 使用MockMvcResultMatchers :mockMvc结果匹配器断言, 在我的测试用例中,使用了两个匹配断言
6.1 、.andExpect(MockMvcResultMatchers.status().isOk()): 用于匹配返回状态码是否为ok,其中一般指200
6.2、.andExpect(MockMvcResultMatchers.jsonPath("$.name", Matchers.equalToIgnoringCase(user.getName()))),其中user为自定义的期望对象 , 对于jsonPath对象,一般用于取返回的Body对象, 对于当前返回的结果如下
1 2 3 4 5 6 7 8 9 MockHttpServletResponse: Status = 200 Error message = null Headers = [Content-Type:"application/json" ] Content type = application/json Body = {"uid" :1 ,"username" :"w" ,"password" :"a" ,"name" :"悟空" ,"email" :"song@foxmail.com" ,"phone" :"13283718600" ,"sex" :"男" ,"state" :1 ,"code" :null ,"addr" :"天子脚下" } Forwarded URL = null Redirected URL = null Cookies = []
假如Body中的json数据有嵌套,同样也是使用如: $.games[0].name 取game[0]对象的name属性
.andDo(MockMvcResultHandlers.print())
如果符合预期结果 则进行print输出响应详细的信息:包括请求头,请求体等常见的字段,比如还有ModelAndView,Response
.andReturn();
真正请求得到响应的内容,真正执行的返回值,返回值可以new一个MockMvc对象返回
其中还包括一些其他的函数,详情见 SpringBoot Test Doc 文档
如果使用这种方式发生注入错误,找不到一个Bean为MockMvc的,那么使用下面这种方案注入
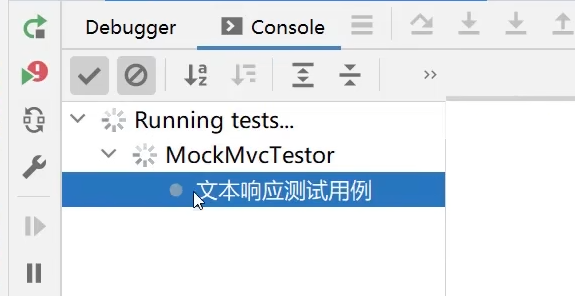
1 2 3 4 5 6 7 8 9 10 11 12 13 14 15 16 17 18 19 20 21 22 23 24 @Slf4j @RunWith(SpringRunner.class) @SpringBootTest(classes = {MockApplication.class}, // 在每一次进行mock测试时 启用随机端口启动 为例避免多个测试用例同时启动时不会产生端口占用问题 webEnvironment = SpringBootTest.WebEnvironment.RANDOM_PORT) public class UserControllerTest { @Autowired private WebApplicationContext webApplicationContext; private MockMvc mockMvc; @Before public void setUp () { mockMvc = MockMvcBuilders.webAppContextSetup(webApplicationContext).build(); } @Test @DisplayName("文本响应测试用例") public void getById () { } @Test public void save () { } }
注意到首先注入了WebApplicationContext对象,然后有一个没有初始化的MockMvc实例
@Before注解: 在每一个测试用例之前调用,每一次都会使用 MockMvcBuilders对webApplicationContext进行构建,从而得到一个实例对象mockMvc @DisplayName("文本响应测试用例")注解: 作用如图例
注入方式一: 自动配置在org.springframework.boot:spring-boot-test-autoconfiguration下的web.servlet.MockMvcAutoConfiguration配置类,
1 2 3 4 5 6 7 8 @Autowired private WebApplicationContext webApplicationContext;private MockMvc mockMvc;@Before public void setUp () { mockMvc = MockMvcBuilders.webAppContextSetup(webApplicationContext).build(); }
注入方式二: 自动配置在org.springframework.boot:spring-boot-test-autoconfiguration下的web.servlet.AutoConfigurationMockMvc注解类
1 2 3 4 5 @AutoConfigureMockMvc(addFilters = false) @Autowired private MockMvc mockMvc;
对于Get请求 示例
1 2 3 4 5 6 7 8 9 10 11 12 13 mockMvc.perform(MockMvcRequestBuilders.get("/user/getById" ) .contentType(MediaType.APPLICATION_JSON_VALUE) .param("id" , "1" ) ) .andExpect(MockMvcResultMatchers.status().isOk()) .andExpect(MockMvcResultMatchers.jsonPath("$.name" , Matchers.equalToIgnoringCase(user.getName()))) .andDo(print()) .andReturn();
对于Post请求 示例
1 2 3 4 5 6 7 8 9 10 11 12 13 14 15 16 17 mockMvc.perform(MockMvcRequestBuilders.post("/user/save" ) .contentType(MediaType.APPLICATION_JSON) .content("{\n" + " \"uid\": \"1\",\n" + " \"username\": \"w\"" + "}" ) .accept(MediaType.APPLICATION_JSON)) .andDo(print()); mockMvc.perform(MockMvcRequestBuilders.post("/user/save" ) .contentType(MediaType.APPLICATION_FORM_URLENCODED) .param("uid" , "1" ) .param("username" , "w" ) .accept(MediaType.APPLICATION_JSON)) .andDo(print());
案例 Service层 1 2 3 4 5 6 7 8 9 10 11 12 13 14 15 16 17 18 19 20 21 22 23 24 25 26 27 28 29 30 31 32 33 34 35 @Slf4j @RunWith(SpringRunner.class) @SpringBootTest(classes = {MockApplication.class}, // 在每一次进行mock测试时 启用随机端口启动 为例避免多个测试用例同时启动时不会产生端口占用问题 webEnvironment = SpringBootTest.WebEnvironment.RANDOM_PORT) public class UserServiceTest { @MockBean private UserMapper userMapper; @Autowired private UserService userService; @Test @DisplayName("测试没有dao数据访问层") public void testEmptyMapper () { User expectUser = new User (1 , "测试没有dao数据访问层" , "11" , "测试没有dao数据访问层" ,"song@foxmail.com" , "13283718600" , "男" , 1 , null , "天子脚下" ); Mockito.when(userMapper.selectById(1 )) .thenReturn(new User (1 , "测试没有dao数据访问层" , "11" , "测试没有dao数据访问层" ,"song@foxmail.com" , "13283718600" , "男" , 1 , null , "天子脚下" )); User user = userService.getUserInfoById(1 ); Assert.assertEquals(expectUser,user); } @Test @DisplayName("测试Service") public void testService () { Mockito.when(userService.getUserInfoById(1 )) .thenReturn(new User (1 , "测试Service" , "11" , "测试没有dao数据访问层" ,"song@foxmail.com" , "13283718600" , "男" , 1 , null , "天子脚下" )); User user = userService.getUserInfoById(1 ); log.info(user.toString()); } }
1.@MockBean: 模拟Bean:Mockito 会帮我们创建一个假的 Mock 对象,替换掉 Spring 中已存在的那个真实的 userDao Bean
2.when: 模拟引导访问的 对象.方法名()
3.thenReturn: 引导访问的返回结果
当前样例1: Mockito.anyInt(),任意的Int类型值
1 2 3 4 Mockito.when(userService.getUserById(Mockito.anyInt())) .thenReturn(new User (3 , "Calyee" )); User user1 = userService.getUserById(3 ); User user2 = userService.getUserById(200 );
当前样例2: 指定的值
1 2 3 Mockito.when(userService.getUserById(3 )).thenReturn(new User (3 , "Calyee" )); User user1 = userService.getUserById(3 ); User user2 = userService.getUserById(200 );
当前样例3: 当调用Insert的时候不论传入的User字节码对象 是谁,都返回100
1 2 Mockito.when(userService.insertUser(Mockito.any(User.class))).thenReturn(100 ); Integer i = userService.insertUser(new User ());
其他注解:
4.thenThrow: 当请求方法传入的值为1时,抛出一个RuntimeException (适用于 有出参的方法 )
1 2 3 Mockito.when(userService.getUserById(1 )) .thenThrow(new RuntimeException ("mock throw exception" )); User user = userService.getUserById(1 );
5.doThrow 如果方法没有返回值的话(即是方法定义为 public void myMethod() {…}),要改用 doThrow() 抛出 Exception, doThrow ( 适用于 没有出参的方法 )
1 2 3 Mockito.doThrow(new RuntimeException ("mock throw exception" )) .when(userService).print(); userService.print();
简单模拟SpringBoot 初始化Spring项目 1.创建maven工程,建两个Module
springboot模块,表示springboot框架的源码实现
user包,表示用户业务系统,用来写业务代码来测试我们所模拟出来的SpringBoot
2.其中SpringBoot也是依赖于Spring,我们需要处理请求,故需要导入SpringMVC,当然还有Tomcat等依赖
导入依赖 (其中Java JDK版本为1.8)
1 2 3 4 5 6 7 8 9 10 11 12 13 14 15 16 17 18 19 20 21 22 23 24 25 26 27 28 29 <dependencies > <dependency > <groupId > org.springframework</groupId > <artifactId > spring-context</artifactId > <version > 5.2.11.RELEASE</version > </dependency > <dependency > <groupId > org.springframework</groupId > <artifactId > spring-web</artifactId > <version > 5.2.11.RELEASE</version > </dependency > <dependency > <groupId > org.springframework</groupId > <artifactId > spring-webmvc</artifactId > <version > 5.2.11.RELEASE</version > </dependency > <dependency > <groupId > javax.servlet</groupId > <artifactId > javax.servlet-api</artifactId > <version > 4.0.1</version > </dependency > <dependency > <groupId > org.apache.tomcat.embed</groupId > <artifactId > tomcat-embed-core</artifactId > <version > 9.0.65</version > </dependency > </dependencies >
在User测试模块中引入刚刚创建的SpringBoot模块(这个是另外一个模块的)
1 2 3 4 5 6 7 <dependencies > <dependency > <groupId > org.springboot</groupId > <artifactId > springboot</artifactId > <version > 1.0-SNAPSHOT</version > </dependency > </dependencies >
在User模块中创建一个标准的测试结构
Controller
1 2 3 4 5 6 7 8 9 10 11 @RestController public class UserController { @Autowired private UserService userService; @GetMapping("/test") public String test () { return userService.test(); } }
Service
1 2 3 4 5 6 @Service public class UserService { public String test () { return "Hello My SpringBoot!" ; } }
核心注解与核心类 启动类
1 2 3 4 5 6 7 8 9 10 11 12 @HangSpringBootApplication public class MyApplication { public static void main (String[] args) { HangSpringApplication.run(MyApplication.class); } }
在springboot模块中创建
启动类标记注解
1 2 3 4 5 6 @Target(ElementType.TYPE) @Retention(RetentionPolicy.RUNTIME) @Configuration @ComponentScan public @interface HangSpringBootApplication {}
启动SpringBoot应用的启动类 -> run()方法
1 2 3 4 public class HangSpringApplication { public static void run (Class clazz) { } }
run方法 首先我们需要的是,启动类执行完成,就可以像原生SpringBoot一样在浏览器上可以访问到localhost:8081/test 方法
那么此时肯定要启动Tomcat容器 ,要想处理请求,在Spring容器中添加创建的DispatcherServlet对象添加到Tomcat里面,最后启动Tomcat
创建Spring容器 1 2 3 4 5 6 7 8 9 10 11 12 13 public class HangSpringApplication { public static void run (Class clazz) { AnnotationConfigWebApplicationContext applicationContext = new AnnotationConfigWebApplicationContext (); applicationContext.register(clazz); applicationContext.refresh(); startTomcat(applicationContext); } }
通过AnnotationConfigWebApplicationContext创建的容器,把传入的clazz作为容器的配置类, 比如此时我传入的是MyApplication.class类,当前类作为配置类,由于当前类头上带有我们刚刚自定义的启动类注解 @HangSpringBootApplication, 其中当前注解内部带有扫描注解 @ComponentScan 那么将会自动默认扫描当前解析类的包路径(传入run方法的类包路径) ,假如设置了明示了扫描路径,则扫描自定义路径, 那么则会扫描到我们的UserService 和 UserController , 然后添加到Spring容器里面
一般情况 我们会直接把启动类当成配置类
而不会进行如下操作: 在其他类中创建启动类,然后在main方法(不是启动类了,没有带启动类标识注解 )中进行HangSpringApplication.run(MyApplication.class)操作 (启动类标识@HangSpringBootApplication当前标明在MyApplication类上)
启动Tomcat 对于SpringBoot,它使用的是内嵌Tomcat方式,对于内嵌Tomcat,我们需要进行配置
1 2 3 4 5 6 7 8 9 10 11 12 13 14 15 16 17 18 19 20 21 22 23 24 25 26 27 28 29 30 31 32 33 34 35 36 37 38 39 public static void startTomcat (WebApplicationContext applicationContext) { Tomcat tomcat = new Tomcat (); Server server = tomcat.getServer(); Service service = server.findService("Tomcat" ); Connector connector = new Connector (); connector.setPort(8081 ); Engine engine = new StandardEngine (); engine.setDefaultHost("localhost" ); Host host = new StandardHost (); host.setName("localhost" ); String contextPath = "" ; Context context = new StandardContext (); context.setPath(contextPath); context.addLifecycleListener(new Tomcat .FixContextListener()); host.addChild(context); engine.addChild(host); service.setContainer(engine); service.addConnector(connector); tomcat.addServlet(contextPath, "dispatcher" , new DispatcherServlet (applicationContext)); context.addServletMappingDecoded("/*" , "dispatcher" ); try { tomcat.start(); } catch (LifecycleException e) { e.printStackTrace(); } }
此时就能启动Tomcat了,可以正常启动了,其中控制台会输出tomcat启动情况,例如刚刚设置的8081端口
浏览器访问localhost:8081/test,结果返回了"Hello My SpringBoot!"
修改其他的服务器 1.在springboot中创建一个抽象方法为:WebServer
1 2 3 4 5 6 7 8 9 public interface WebServer { public void start (WebApplicationContext applicationContext) ; }
2.定义其他服务器接口实现类
1 2 3 4 5 6 7 8 9 10 11 12 13 14 15 16 17 18 19 20 21 22 23 24 25 26 27 28 29 30 31 32 33 34 35 36 37 38 39 40 41 42 43 44 45 46 47 48 49 50 51 public class TomcatWebServer implements WebServer { @Override public void start (WebApplicationContext applicationContext) { Tomcat tomcat = new Tomcat (); Server server = tomcat.getServer(); Service service = server.findService("Tomcat" ); Connector connector = new Connector (); connector.setPort(8081 ); Engine engine = new StandardEngine (); engine.setDefaultHost("localhost" ); Host host = new StandardHost (); host.setName("localhost" ); String contextPath = "" ; Context context = new StandardContext (); context.setPath(contextPath); context.addLifecycleListener(new Tomcat .FixContextListener()); host.addChild(context); engine.addChild(host); service.setContainer(engine); service.addConnector(connector); tomcat.addServlet(contextPath, "dispatcher" , new DispatcherServlet (applicationContext)); context.addServletMappingDecoded("/*" , "dispatcher" ); try { tomcat.start(); } catch (LifecycleException e) { e.printStackTrace(); } } }
1 2 3 4 5 6 7 8 9 10 11 12 13 public class JettyWebServer implements WebServer { @Override public void start (WebApplicationContext applicationContext) { System.out.println("启动jetty" ); } }
以上添加了两个示例服务实现类
再次修改run方法
1 2 3 4 5 6 7 8 9 10 11 12 13 14 15 16 17 18 19 20 21 22 23 24 25 26 27 28 29 30 31 32 33 34 35 36 37 38 public class HangSpringApplication { public static void run (Class clazz) { AnnotationConfigWebApplicationContext applicationContext = new AnnotationConfigWebApplicationContext (); applicationContext.register(clazz); applicationContext.refresh(); WebServer webServer = getWebServer(applicationContext); webServer.start(applicationContext); } private static WebServer getWebServer (WebApplicationContext webApplicationContext) { Map<String,WebServer> webServers = webApplicationContext.getBeansOfType(WebServer.class); if (webServers.isEmpty()){ throw new NullPointerException (); } if (webServers.size() > 1 ){ throw new IllegalStateException (); } return webServers.values().stream().findFirst().get(); } }
此时,在启动类中添加一个Tomcat 的Bean
1 2 3 4 5 6 7 8 9 10 11 12 13 14 15 @HangSpringBootApplication public class MyApplication { @Bean public TomcatWebServer tomcatWebServer () { return new TomcatWebServer (); } public static void main (String[] args) { HangSpringApplication.run(MyApplication.class); } }
当然,自己在启动类中配置服务器的bean,显然耦合度太高了,至此我们需要引入新的方案
自动配置WebServer服务 首先在springboot模块中添加WebServerAutoConfiguration
1 2 3 4 5 6 7 8 9 10 11 12 13 14 15 16 17 18 19 20 21 22 @Configuration public class WebServerAutoConfiguration { @Bean @Conditional(TomcatCondition.class) public TomcatWebServer tomcatWebServer () { return new TomcatWebServer (); } @Bean @Conditional(JettyCondition.class) public JettyWebServer jettyWebServer () { return new JettyWebServer (); } }
其中发现有一个注解为 @Conditional(TomcatCondition.class)
该注解,当该Condition.class判断返回的boolean结果,作为是否执行该方法的条件,如果返回true则该注解修饰的该方法可执行
其中TomcatCondition类需要自定义:
1 2 3 4 5 6 7 8 9 10 11 12 13 14 15 public class TomcatCondition implements Condition { @Override public boolean matches (ConditionContext conditionContext, AnnotatedTypeMetadata annotatedTypeMetadata) { try { conditionContext.getClassLoader().loadClass("org.apache.catalina.startup.Tomcat" ); return true ; } catch (ClassNotFoundException e) { return false ; } } }
走到这了, 上面的目标就是,检查当前依赖是否包含修饰的依赖项, 实现自动判断
现在还会出现问题, 就是 不能像SpringBoot一样,默认Tomcat, 排除其他的服务器依赖给子项目, 此时要在父项目中的pom.xml中设置<optional>true</optional>属性: 该依赖在项目之间依赖不传递
1 2 3 4 5 6 7 8 9 10 11 12 13 14 15 <dependency > <groupId > org.apache.tomcat.embed</groupId > <artifactId > tomcat-embed-core</artifactId > <version > 9.0.65</version > </dependency > <dependency > <groupId > org.eclipse.jetty</groupId > <artifactId > jetty-maven-plugin</artifactId > <version > 9.4.14.v20181114</version > <optional > true</optional > </dependency >
此时, 如果在子模块中想切换jetty ,在依赖父项目处使用exclusion排除父项目传递的依赖, 再添加其他依赖, 示例如下
1 2 3 4 5 6 7 8 9 10 11 12 13 14 15 16 17 18 19 20 <dependencies > <dependency > <groupId > com.hang</groupId > <artifactId > springboot</artifactId > <version > 1.0-SNAPSHOT</version > <exclusions > <exclusion > <groupId > org.apache.tomcat.embed</groupId > <artifactId > tomcat-embed-core</artifactId > </exclusion > </exclusions > </dependency > <dependency > <groupId > org.eclipse.jetty</groupId > <artifactId > jetty-maven-plugin</artifactId > <version > 9.4.14.v20181114</version > </dependency > </dependencies >
模拟条件注解 在上面的模拟方案, 基于两个服务器的选择从而定义了两个Condition类: 1.TomcatCondition 2.JettyCondition
大胆想象, 加入有很多服务器需要筛选, 然后发现全部都是重复的代码, 何不如封装一下呢
仿SpringBoot的ConditionalOnClass编写一个HangConditionalOnClass.
1 2 3 4 5 6 7 8 9 10 @Target({ElementType.TYPE, ElementType.METHOD}) @Retention(RetentionPolicy.RUNTIME) @Conditional(HangCondition.class) public @interface HangConditionalOnClass { String value () ; }
HangCondition类
1 2 3 4 5 6 7 8 9 10 11 12 13 14 15 16 17 public class HangCondition implements Condition { @Override public boolean matches (ConditionContext conditionContext, AnnotatedTypeMetadata annotatedTypeMetadata) { Map<String, Object> annotationAttributes = annotatedTypeMetadata.getAnnotationAttributes(HangConditionalOnClass.class.getName()); String values = (String) annotationAttributes.get("value" ); try { conditionContext.getClassLoader().loadClass(values); return true ; } catch (ClassNotFoundException e) { return false ; } } }
自动配置类 有了条件注解,我们就可以来使⽤它了,那如何实现呢?这⾥就要⽤到⾃动配置类的概念,我们先看代码:
1 2 3 4 5 6 7 8 9 10 11 12 13 @Configuration public class WebServiceAutoConfiguration { @Bean @HangConditionalOnClass("org.apache.catalina.startup.Tomcat") public TomcatWebServer tomcatWebServer () { return new TomcatWebServer (); } @Bean @HangConditionalOnClass("org.eclipse.jetty.server.Server") public JettyWebServer jettyWebServer () { return new JettyWebServer (); } }
这个代码跟最开始的大同小异, 只不过加了我们的条件注解
要实现服务器自动配置只需要在过滤掉所有bean留下唯一的bean就行了
这样整体SpringBoot启动逻辑就是这样的:
创建⼀个AnnotationConfigWebApplicationContext容器
解析MyApplication类,然后进⾏扫描
通过getWebServer⽅法从Spring容器中获取WebServer类型的Bean
调⽤WebServer对象的start⽅法
有了以上步骤,我们还差了⼀个关键步骤,就是Spring要能解析到WebServiceAutoConfiguration这个⾃动配置类,因为不管这个类⾥写了什么代码,Spring不去解析它,那都是没⽤的,此时我们需要SpringBoot在run⽅法中,能找到WebServiceAutoConfiguration这个配置类并添加到Spring容器中。
基于包扫描, 在SpringBoot中自己实现了一套SPI机制, 也就是熟悉的spring.factories
发现自动配置类 基于SPI机制, SpringBoot约定在项目的resource目录下的META_INF中创建spring.factories, 配置SpringBoot中所需扫描的类
并且提供一个接口
HangAutoConfiguration
1 2 public interface HangAutoConfiguration {}
然后在WebServiceAutoConfiguration实现此接口
1 2 3 4 5 6 7 8 9 10 11 12 13 @Configuration public class WebServiceAutoConfiguration implements HangAutoConfiguration { @Bean @HangConditionalOnClass("org.apache.catalina.startup.Tomcat") public TomcatWebServer tomcatWebServer () { return new TomcatWebServer (); } @Bean @HangConditionalOnClass("org.eclipse.jetty.server.Server") public JettyWebServer jettyWebServer () { return new JettyWebServer (); } }
然后利用spring中的@Import技术导入这些配置类, 我们在@HangSpringBootApplication的定义上增加
1 @Import(HangImportSelect.class)
1 2 3 4 5 6 7 8 9 10 11 public class ZhouyuImportSelect implements DeferredImportSelector { @Override public String[] selectImports(AnnotationMetadata importingClassMetadata) { ServiceLoader<AutoConfiguration> serviceLoader = ServiceLoader.load(AutoConfiguration.class); List<String> list = new ArrayList <>(); for (AutoConfiguration autoConfiguration : serviceLoader) { list.add(autoConfiguration.getClass().getName()); } return list.toArray(new String [0 ]); } }
这就完成了从com.zhouyu.springboot.AutoConfiguration⽂件中获取⾃动配置类的名字,并导⼊到Spring容器中,从⽽Spring容器就知道了这些配置类的存在,⽽对于user项⽬⽽⾔,是不需要修改代码的。